Lots of things have been in flow since I’ve posted here, but here are few tidbits to explore:
geeky
We: Social Spaces for Collaboration
Say that we agree to define collaboration as a group’s ability to coordinate effort to produce some work output. I believe that the effectiveness of collaboration improves in direct proportion to:
- how easy it is to create social spaces in which to do that coordination,
- the degree of composability of those social spaces (especially nesting)
- the variety and utility of the affordances provided in those spaces.
Together let’s call these the claims of Collaborative Power.
Let’s look at some examples:
Version control
Git enables easily creating a social space for coordinating work on a code base. It does this by providing affordances such as; committing, diffing, branching and merging, to assist in that coordination. The affordance of branching is itself an example of Collaborative Power. Within the social space of a code repository, a branch also creates a secondary, simple and secure, social space for further collaboration, or a sub-space. It’s a semantically separate and differentiated place for a sub-group (perhaps of one) to work on the code. This was Git’s “Killer Feature”, branching made trivially cheap.
Channel based messaging
Tools like Discord, Slack and Mattermost make it trivially easy to create the high-level social space of a “Team” or “Server”, and within that, semantically tagged sub-spaces of chat channels. This is analogous to the Repo and Branch levels of VCS systems but for messaging. The ease and low cost of creating social spaces at both of these levels, and the affordances in those spaces (video/audio chat, screen-sharing, bots, etc) make these tools easy to adopt and continue to use.
Generalized Collaborative Power
Is it possible to generalize tooling for Collaborative Power? In other words, what technical affordances would be necessary for creating generalized sub-spaces within a high-level social context?
Imagine being able to create a social space for collaborative work-groups, where what is made trivially easy to instantiate and assemble inside the space, is not one single secondary type of sub-space (i.e. a branch as in a VCS, or a channel in a messaging system) but the mini-apps of your choice, within a simple composible frame.
Enter We
We is a new Holochain app we’re building over at Lightningrod Labs that provides this heightened Collaborative Power. We makes it trivially easy for users to create high-level social spaces and add “applets” to them. These applets provide the functionality for the exact types of collaboration intended by the group.
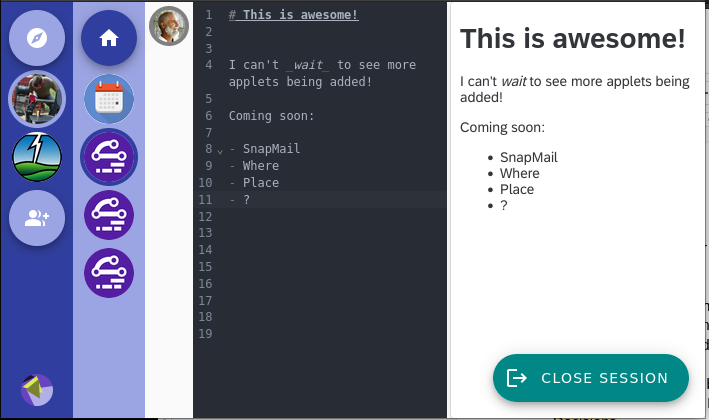
The UI looks a little like Slack or Discord. There’s a left-hand bar showing your “we-groups”, but instead of the right hand being the channel text stream, there is a secondary bar of “Applets” that have been instantiated into that social space, with the main right-hand window space displaying the UI of one or more of those applets. Here’s a screenshot showing a social space with the Notebooks applet active, which provides a real-time collaborative markdown-editing:
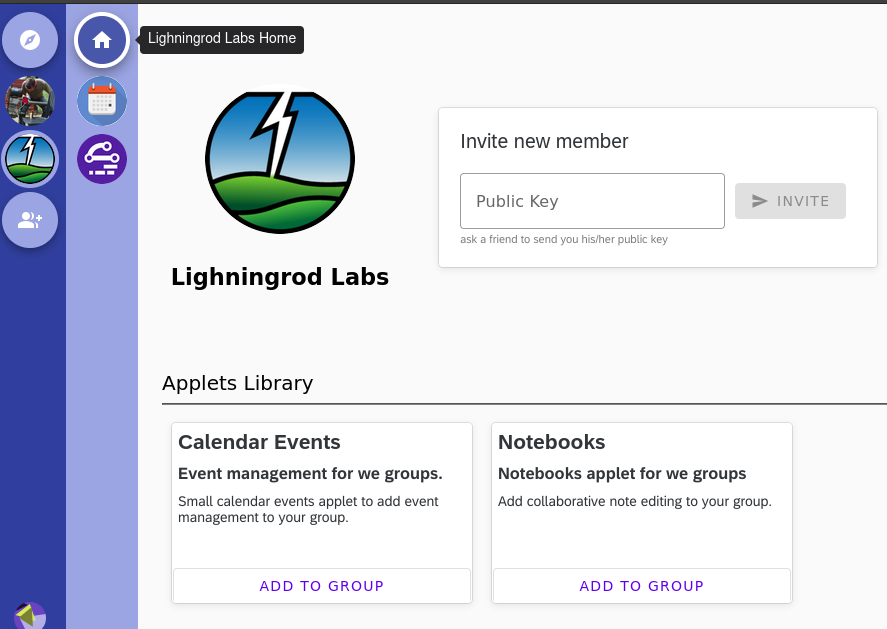
The power of We comes from how easy it is from both a user’s and a developer’s perspective to add new collaboration affordances. End users simply pick them directly in the Applet Library:
For Holochain hApp developers, this addition makes it very simple to compile, build, and publish to the DevHub their existing hApps as “we-applets”. Then any such hApps become instantly available for composing into We social spaces.
Distributed Groupware
In a way, We might “just” look like another attempt at a groupware tool, but there are few things things that set it apart:
- Generality and Openness: We makes no assumption about the content of collaboration. The affordances of the social spaces are entirely customizable by each group according to the group’s purpose. If a group needs a new social tooling, it can just be added in.
- Decentralization: Although, as mentioned, cheap branching is a key feature of Git, its primary design goal was to make possible a fully distributed version control for the linux operating system, such that no central authority could possibly take ownership of its development. This design is arguably Git’s true super-power; and likewise, because We is built on Holochain, it also provides generalized group-forming capability in the fully distributed context. No central servers or infrastructure is necessary. Simply install the Holochain Launcher and then pick “We” from the App Library.
- Agent-centricity: As a consequence of being built on Holochain, We’s core intent of group collaboration happens from an architecture of empowered agency. Individuals can start groups on-the-fly without request from any authority. Within groups individuals must opt-in to any applet that other agents propose for the group.
Where “We” is going…
The initial release of We demonstrates the key Collaborative Power functionality of adding new applets into social spaces on-the-fly. The next steps come from adding compositional grammatics to applets. These grammatics exist at a few levels:
- Visual: the ability to visually compose applet UIs into complex dashboards/layouts instead of just toggling between monolithic UIs.
- Templating: the ability to create a preset menu of applets that work well together and are easily installable as a group, including their layouts.
- Functional (the 4 “F”s); the ability to evolve social spaces over time:
- Forge: meaning the visual and templating for new group formation.
- Federate: inter-group protocols and connections that allow groups membraned interactions
- Fork: easy spinning up of new groups from existing groups, including data transferability.
- Fuse: easy merging of groups together.
Subsequent releases of We will focus on adding in all these grammatical elements, listed above.
So, back to the claims of Collaborative Power:
Collaboration effectiveness improves in direct proportion to both how easy it is to create nested social spaces in which to do that coordination, and the power of the affordances in those spaces to be recomposed overtime
We provides a significant upgrade to the ease of assembling affordances in social spaces. And it does so while upholding the significant properties of Generality, Decentralization, Agent-Centricity along with providing explicit grammatics for visual assembly, templating and evolution of social spaces.
We hope to see you in We!
P.S: For the technically inclined, hop on over to our github repo and check out the instructions on how to convert your regular hApp to be We ready!
Behold, the magpi…
And, YAAP (Yet Another Arduino Project), the Micro Arduino Gaming Platform Interface. Finally I’ve done the “shareable value” part of putting together an instructables for how to make the retro-game controller I built for (and with) Will for Christmas. I love this video of Will demoing it:
Das Blinken Bonken!
Seems like end of the year is DYI electronics projects time for me as the Sound Alarm happened round this time last year too. Well, I’ve been having a ball making Arduino stuff, this time as Christmas presents. This time I got my documentation act together even more and made a construction tutorial on instructables too! The code for Das Blinken Bonken is on github, and here’s a video of Jesse showing off the game:
Arduino Sound Alarm
I’ve just completed my second Arduino project, a sound level detector which sets off an “alarm” when there’s the sound level is to high for too long. I built it for use in a school that wants to provide visual feedback to students when they are being too loud. The “alarm” is a string of flashing LEDs that’s controlled by an IR-remote, which I reverse engineered using the the arduino itself and the excellent IRremote library to figure out which codes activate the LED string. The IRremote library includes an example that dumps the codes and code types that remotes typically use. So I just ran that example with my arduino hooked up to an IR detector from adafruit. It was really quite easy to do.
It’s been a fun project because it’s quite flexible and configurable. Here’s a short video of the finished product:
For anyone who wants to build one of these here’s a bread-board diagram that I made using the very cool Fritzing package:

The Adruino sketch that powers this is available on github.
Here are some details on the circuitry. The sound detector is based on the ZX-Sound board. Here’s a nice post on the arduino.cc site that I used as my starting place for building the sound part of this board. The video helpfully includes a parts list which I sourced from Allied electronics, all except for the mic. The LCD is the $10 16×2 from Adafruit (their tutorial on wiring it up was great), and I also used their electret microphone. One note about the microphone is that it’s polarity matters. If you get it in backwards, it’s much less sensitive. I found this out purely by accident! I also used their IR LED.
Here are some photos of assembling the project.
First the prototyping phase:

Then building the connector for the LCD:


Then drilling holes and installing the configuration controls (push-button and pot)


Then assembling and soldering the board with the sound circuit and the trim pot for the LCD as well as the resistor for the IR LED.


Finally, just before enclosing..

The completed project. Note that I left the mic and IR LED lose because I’m not sure exactly where the alarm is going to be installed and the way they face could matter.

Some lessons learned:
- When soldering a header for an LCD remember to take into account that if you copy the wiring order as you have plugged it into the bread-board, you will actually be doing it backwards because the connecter will be attached upside-down!
- You will need to drill a little extra hole in your case to accept the tab on the pot that keeps it from rotating when you spin the shaft.
- Electret microphones have a polarity.
- Hot-glue is great for attaching push-buttons.
- Ask you children for UI advice! Will had the excellent idea of using the setup-pot to spin between the different settings. In the original code I had it so you had to press the button to toggle between the setup parameters and then do a long-press to actually set one. The way it ended up is much better.
Parts List:
Arduino Uno: https://www.adafruit.com/products/50 ($29.95)
Makershed Arduino Enclosure: http://www.makershed.com/Clear_Enclosure_for_Arduino_p/mkad40.htm ($15.00)
9V powersupply: https://www.adafruit.com/products/63 ($6.95)
100K Potentiometer: Radioshack ($1.69)
pushbutton switch: Radioshack ($.99)
Breadboard PCB: https://www.adafruit.com/products/589 ($3.00)
Electret Mic: https://www.adafruit.com/products/1064 ($1.50)
IR LED: https://www.adafruit.com/products/387 ($.75)
LCD 2×16: https://www.adafruit.com/products/181 ($9.95)
Components: (~$5)
- resistors: 1k ohm x 2; 100k ohm x 2; 12 ohm; 39k ohm; 22k ohm; 230 ohm (for IR led)
- capacitors: 470uf 16v; 0.1uf 50v; 22uf 25v
- Dual op amp IC: TLC272
Total Price: ~$70
gendocs
Autodoc is a great tool for automatic documentation generation for your clojure code (the clojure api itself uses it).
If you are using github-pages to publish the docs, here’s a simple little gendocs sh script to dump into your bin folder to do all the work in one go:
#!/bin/sh if [ -d "autodoc" ] then echo "generating docs..." lein autodoc echo "pushing to github..." cd autodoc git add -A git commit -m "Documentation update" git push origin gh-pages cd .. else echo "No autodoc dir! Run this from your project" fi |
Upgrading postgres on Snow Leopard (Mac OS X 10.6)
Well, I too have gone down the rabbit hole of having to upgrade compiled-from-source apps to 64bit architecture after moving to Snow Leopard. The hardest by far was postgres. The sad thing is that 32bit version works just fine, but the adapter gems for rails don’t, hence the need for the recompile.
Mostly I followed this blog post, but it assumes that you had previously installed postgres using his instructions for Leopard which I hadn’t.
My previous installation was at /usr/local/postgres and these instructions end up installing it at /usr/local/pgsql, so my task also includes getting the data from my previous installation to the new on.
I also took some some hints from this post.
Here’s the blow by blow:
Make a backup of all my data from the 32bit version:
pg_dumpall > /tmp/32-bit-dump.sql |
Switch to super user, make a directory for the source (if you haven’t already), download and extract it:
sudo su mkdir /usr/local/src cd /usr/local/src curl -O http://ftp9.us.postgresql.org/pub/mirrors/postgresql/source/v8.3.8/postgresql-8.3.8.tar.gz tar -zvxf postgresql-8.3.8.tar.gz rm postgresql-8.3.8.tar.gz |
Now configure, make and install it:
cd postgresql-8.3.8 ./configure --enable-thread-safety --with-bonjour make make install |
Then I followed the instructions from the above mentioned blog on how to make a postgres user, but I did them in a different terminal window because remember the other one we were logged in as root:
“First, you’ll need to find an unused user and group ID. Use the following commands to list the IDs for the users and groups on your system.”
dscl . -list /Groups PrimaryGroupID | awk '{print $2}' | sort -n
dscl . -list /Users UniqueID | awk '{print $2}' | sort -n |
“For the purposes of this tutorial, let’s assume an ID of 113 for both the user and the group. Since the convention is to prefix system accounts with an underscore, use the following commands to create a user called _postgres:”
sudo dscl . create /Users/_postgres UniqueID 113 sudo dscl . create /Users/_postgres PrimaryGroupID 113 sudo dscl . create /Users/_postgres NFSHomeDirectory /usr/local/pgsql/ sudo dscl . create /Users/_postgres RealName "PostgreSQL Server" sudo dscl . create /Users/_postgres Password "*" sudo dscl . append /Users/_postgres RecordName postgres |
“Then, create the _postgres group:”
sudo dscl . create /Groups/_postgres sudo dscl . create /Groups/_postgres PrimaryGroupID 113 sudo dscl . append /Groups/_postgres RecordName postgres sudo dscl . create /Groups/_postgres RealName "PostgreSQL Users" |
So at this point the binaries are installed and there’s a user to run it under, but I needed to initialize a new database and copy back in my saved data. First create the data and log directories and set perms:
sudo mkdir /usr/local/pgsql/data sudo chown postgres:postgres /usr/local/pgsql/data sudo mkdir /usr/local/pgsql/log sudo chown postgres:postgres /usr/local/pgsql/log |
Then I logged in as the _postgres user:
sudo su su - _postgres |
And initialize database files and start up the database:
/usr/local/pgsql/bin/initdb -E UTF8 -D /usr/local/pgsql/data/ /usr/local/pgsql/bin/pg_ctl -D /usr/local/pgsql/data/ -l /usr/local/pgsql/log/postgresql.log start |
Finally I restored the data from my initial pg_dumpall
/usr/local/pgsql/bin/psql -U postgres -f /tmp/32-bit-dump.sql |
I’ve also added these lines into my .profile to add the commands to my path and to simplify starting and stopping the database:
export PATH=$PATH:/usr/local/pgsql/bin export MANPATH=$MANPATH:/usr/local/pgsql/man alias pg_stop='sudo -u postgres pg_ctl -D /usr/local/pgsql/data stop' alias pg_start='sudo -u postgres pg_ctl -D /usr/local/pgsql/data -l /usr/local/pgsql/log/posgtres.log start' |
And then finally I could install the postgres rails gem (which was the whole point of this silly excercise):
sudo env ARCHFLAGS="-arch x86_64" gem install pg |