I’ve just completed my second Arduino project, a sound level detector which sets off an “alarm” when there’s the sound level is to high for too long. I built it for use in a school that wants to provide visual feedback to students when they are being too loud. The “alarm” is a string of flashing LEDs that’s controlled by an IR-remote, which I reverse engineered using the the arduino itself and the excellent IRremote library to figure out which codes activate the LED string. The IRremote library includes an example that dumps the codes and code types that remotes typically use. So I just ran that example with my arduino hooked up to an IR detector from adafruit. It was really quite easy to do.
It’s been a fun project because it’s quite flexible and configurable. Here’s a short video of the finished product:
For anyone who wants to build one of these here’s a bread-board diagram that I made using the very cool Fritzing package:
The Adruino sketch that powers this is available on github.
Here are some details on the circuitry. The sound detector is based on the ZX-Sound board. Here’s a nice post on the arduino.cc site that I used as my starting place for building the sound part of this board. The video helpfully includes a parts list which I sourced from Allied electronics, all except for the mic. The LCD is the $10 16×2 from Adafruit (their tutorial on wiring it up was great), and I also used their electret microphone. One note about the microphone is that it’s polarity matters. If you get it in backwards, it’s much less sensitive. I found this out purely by accident! I also used their IR LED.
Here are some photos of assembling the project.
First the prototyping phase:
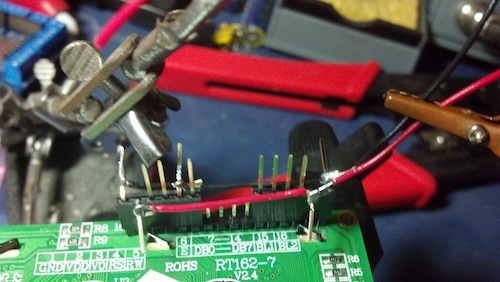
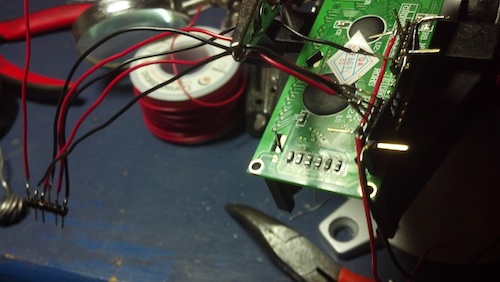
Then building the connector for the LCD:
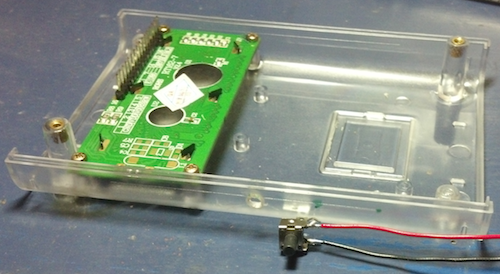
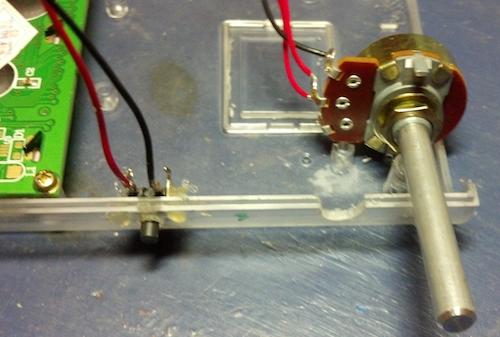
Then drilling holes and installing the configuration controls (push-button and pot)
Then assembling and soldering the board with the sound circuit and the trim pot for the LCD as well as the resistor for the IR LED.
Finally, just before enclosing..
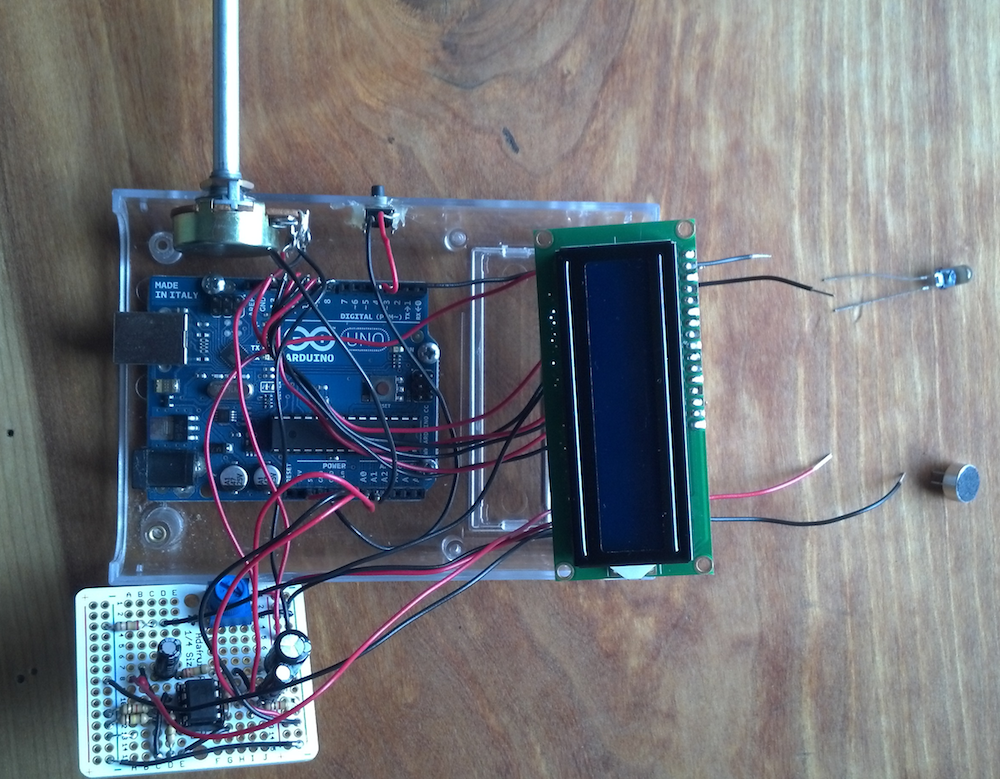
The completed project. Note that I left the mic and IR LED lose because I’m not sure exactly where the alarm is going to be installed and the way they face could matter.
Some lessons learned:
- When soldering a header for an LCD remember to take into account that if you copy the wiring order as you have plugged it into the bread-board, you will actually be doing it backwards because the connecter will be attached upside-down!
- You will need to drill a little extra hole in your case to accept the tab on the pot that keeps it from rotating when you spin the shaft.
- Electret microphones have a polarity.
- Hot-glue is great for attaching push-buttons.
- Ask you children for UI advice! Will had the excellent idea of using the setup-pot to spin between the different settings. In the original code I had it so you had to press the button to toggle between the setup parameters and then do a long-press to actually set one. The way it ended up is much better.
Parts List:
Arduino Uno: https://www.adafruit.com/products/50 ($29.95)
Makershed Arduino Enclosure: http://www.makershed.com/Clear_Enclosure_for_Arduino_p/mkad40.htm ($15.00)
9V powersupply: https://www.adafruit.com/products/63 ($6.95)
100K Potentiometer: Radioshack ($1.69)
pushbutton switch: Radioshack ($.99)
Breadboard PCB: https://www.adafruit.com/products/589 ($3.00)
Electret Mic: https://www.adafruit.com/products/1064 ($1.50)
IR LED: https://www.adafruit.com/products/387 ($.75)
LCD 2×16: https://www.adafruit.com/products/181 ($9.95)
Components: (~$5)
- resistors: 1k ohm x 2; 100k ohm x 2; 12 ohm; 39k ohm; 22k ohm; 230 ohm (for IR led)
- capacitors: 470uf 16v; 0.1uf 50v; 22uf 25v
- Dual op amp IC: TLC272
Total Price: ~$70





Awesome! This is exactly what we’re looking for and more!
We’re using this as a noise level detector in our the lobby of our school as a tool to give the kids visual feedback about the noise level they’re making.
I’ll install it in our lobby and take some pictures (and maybe video) that you can add to the post.
I love the screen and UI. I thought we were going to have to plug it into a computer to adjust parameters and behavior. It’s much nicer this way.
Thanks Eric!
Hi,
I wanted to let you know your Arduino project has been added to a list of 20 Arduino projects of 2012 published on Nudatech’s blog ( http://www.nudatech.com/blog/20-arduino-projects-of-2012/ ).
Please let me know if there’s any mistake in the short note I wrote about it and if the link I chose for it is the right one.
Obviously sharing the list on social networks, blogs and forums is also appreciated
Regards
hiee.
can u please tell me if there is any coding required in this project…
if yes please mail me the code at aanchal018@gmail.com
Hi Aanchal,
You shouldn’t have to do any extra coding on the project as it is all available on github here: https://github.com/zippy/sound_alarm
Holler if you have any questions.
-Eric
Hi Eric,
I could not get it how IR receiver works. Is not there any circuit for that ?
The IR receiver is part of the circuit. If you look at the fritzing digaram you see that it’s attached to pin 3 of the Arduino and also to a resistor that goes to ground. The IR works in software in that the Arduino monitors the data on that pin coming from the IR receiver.
Hi,
Hi Eric,
I tried to correct the problem by deleting the IR function , it succeeded ,
but it was me another error Compile not find Wprogram.h ,
Arduino it should have been in the installation itself which I do not ,
I have done so reinstalling the program, and I was another mistake by the instruction ” Bounce ”
respectively . –
Sound_Alarm_no_IR_code_-_test.ino:209: error: ‘Bounce’ does not name a type
Sound_Alarm_no_IR_code_-_test.ino: In function ‘void loop()’:
Sound_Alarm_no_IR_code_-_test.ino:240: error: ‘bouncer’ was not declared in this scope
Sound_Alarm_no_IR_code_-_test.ino: In function ‘boolean shortPress()’:
Sound_Alarm_no_IR_code_-_test.ino:534: error: ‘bouncer’ was not declared in this scope
Sound_Alarm_no_IR_code_-_test.ino: In function ‘boolean longPress()’:
Sound_Alarm_no_IR_code_-_test.ino:538: error: ‘bouncer’ was not declared in this scope
all the code that I am trying to compile them :
–
/*
* Alarm: Monitors a voltage source and triggers an alarm if it’s greater that a value
* for more than a configured percent of a configured time.
*
* See the readme for documentation (https://github.com/zippy/sound_alarm/blob/master/README.md)
*
* This program is free software; you can redistribute it and/or
* modify it under the terms of the GNU Lesser General Public
* License as published by the Free Software Foundation; either
* version 2.1 of the License, or (at your option) any later version.
*/
#define DEBUG 1
#include
#include
#include
#include
#include
const int potPin = 1;
const int buttonPin = 4;
const int irPin = 3;
const int soundPin = 0;
#define SETUP_STATE 0
#define NORMAL_STATE 1
#define ALARM_STATE 2
#define AUTOLEVEL_STATE 3
#define CALIBRATE_RANGE_STATE 4
#define GET_PARAM_STATE 5
#define SECOND 1000
int state = NORMAL_STATE;
unsigned long timeRef;
int ll; // variable to hold that last level displayed
Debug debug;
LiquidCrystal lcd(13, 8, 9, 10, 11, 12);
class Alarm {
public:
int threshold;
int level;
int period;
int reset_period;
int range_high; // lowest voltage value expected from digitalRead of soundPin
int range_low; // highest voltage value expected from digitalRead of soundPin
int range;
unsigned long counts_above;
unsigned long counts_below;
unsigned long val;
int alarm_percent;
unsigned int alarms;
boolean auto_adjust;
void setThreshold(int t);
void setRange(int h, int l);
void autoAdjustRange(int val);
Alarm(void);
};
Alarm::Alarm() {
auto_adjust = true;
setRange(850,0);
setThreshold(500);
period = SECOND*1;
reset_period = SECOND*10;
alarm_percent = 40;
}
void Alarm::setThreshold(int t) {
threshold = t;
level = map(t, range_low, range_high, 0, 15);
}
void Alarm::setRange(int h, int l) {
range_high = h;
range_low = l;
range = h-l;
setThreshold(threshold); // do this to re-map the quantized level to the new range.
}
void Alarm::autoAdjustRange(int val) {
if (auto_adjust) {
if (val > range_high) { // we are experiencing something above the usual range, auto adjust the range.
setRange(val,range_low);
}
if (val tr) {
int s = analogRead(soundPin);
//debug.msg(“VAL = “,s);
a.autoAdjustRange(s);
displayLevel(s);
a.val += s;
if (s > a.threshold) {
a.counts_above++;
}
else {
a.counts_below++;
}
}
else {
timeRef = tr;
debug.msg(“above = “,a.counts_above);
debug.msg(“below = “,a.counts_below);
unsigned int total = (a.counts_below+a.counts_above);
float p = map(a.counts_above, 0, total, 0, 100);
debug.msgf(“percent above = “, p);
debug.msgf(“average = “, (a.val+1.0)/total);
if (p >= a.alarm_percent) {
setAlarmState();
}
a.counts_above = 0;
a.counts_below = 0;
a.val = 0;
}
}
}
//************************************************************
// Setup Mode functions
unsigned long pv;
int count;
void initializeParamPot() {
pv = 0;
count = 0;
}
#define INITIALIZING 0
#define CHANGED 1
#define SAME 2
int readParamPot(unsigned int &cur_val)
{
unsigned int p = analogRead(potPin);
boolean value_changed = false;
if (count < 1000) {
pv += p;
count++;
cur_val = 0;
return INITIALIZING;
}
else {
unsigned int avg = pv/count;
debug.msg("pv:",pv);
debug.msg("p:",p);
debug.msg("count:",count);
debug.msg("avg:",avg);
if (p != avg) {
value_changed = true;
}
cur_val = avg;
count = count/2;
pv = pv/2;
}
return value_changed ? CHANGED : SAME;
}
int setup_param;
void setSetupState(int p) {
setup_param = p;
lcd.clear();
displaySetupParam();
setState(SETUP_STATE);
}
void displaySetupParam() {
lcd.setCursor(0,0);
for (int i=0; idisplay(VIEW);
}
void doSetupState() {
if (shortPress()) {
lcd.clear();
Serial.println(“–Setting–“);
lcd_println(“–Setting–“);
params[setup_param]->set();
}
else if (longPress()) {
setNormalState();
}
else {
unsigned int val;
int result = readParamPot(val);
if (result == CHANGED) {
setup_param = map(val, 0, 1023, 0, setup_params);
displaySetupParam();
}
}
}
//************************************************************
// Get param mode functions
void setGetParamState() {
setState(GET_PARAM_STATE);
initializeParamPot();
}
void doGetParamState() {
if (shortPress()) {
setSetupState(setup_param);
}
else {
unsigned int val;
int result = readParamPot(val);
if (result != INITIALIZING) {
params[setup_param]->updateValue(val);
if (result == CHANGED) {
debug.msg(“val:”,val);
params[setup_param]->display(SET);
}
}
}
}
//************************************************************
// Autolevel mode functions
void setAutolevelState() {
setState(AUTOLEVEL_STATE);
// a.setRange(0,1000); // set opposite range
a.setThreshold(0); // set level to null
ll = -1;
}
void doAutoLevelState() {
if (shortPress()) {
setSetupState(setup_param);
}
else {
int s = analogRead(soundPin);
if (s a.threshold) {
if (s > a.range_high) {
a.setRange(s,a.range_low);
}
a.setThreshold(s);
}
displayLevel(s);
}
}
//************************************************************
// Calibrate range mode functions
void setCalRangeState() {
setState(CALIBRATE_RANGE_STATE);
a.setRange(0,1000); // set inverted range
ll = -1;
}
void doCalRangeState() {
if (shortPress()) {
setSetupState(setup_param);
}
else {
int s = analogRead(soundPin);
if (s a.range_high) {
a.setRange(s,a.range_low);
lcd.setCursor(0,1);
lcd.print(“High: “);
lcd.print(a.range_high);
lcd.setCursor(0,0);
}
displayLevel(s);
}
}
//************************************************************
// Alarm mode functions
void setAlarmState() {
lcd.clear();
setState(ALARM_STATE);
timeRef = millis();
a.alarms++;
alarmOn();
}
void doAlarmState() {
if (shortPress()) {
setNormalState();
}
else {
unsigned long tr = millis();
if (timeRef + a.reset_period 1000)) {
wait_for_rising_edge = true;
}
return wait_for_rising_edge;
}
//************************************************************
// LCD display functions
void displayLevelForce(int val) {
ll = -1;
displayLevel(val);
}
void displayLevel(int val) {
int level = map(val, a.range_low, a.range_high, 1, 16);
if (level != ll) {
drawLevel(level,val);
ll = level;
}
}
char level_meter[17];
char lcd_level_meter[17];
void drawLevel(int level,int val) {
level–;
lcd.setCursor(0, 0);
for (int i=0; i<level; i++) {
level_meter[i] = '#';
lcd_level_meter[i] = 1;
// lcd.write((uint8_t)0);
// Serial.print("#");
}
for (int i=level; i a.level) ? 4 : 3;
level_meter[16] = 0;
lcd_level_meter[16] = 0;
if (lcd_level_meter[15] == 2) {
lcd_level_meter[15] = 6;
}
if (lcd_level_meter[0] == 2) {
lcd_level_meter[0] = 5;
}
Serial.println(level_meter);
Serial.print(“Low:”); Serial.print(a.range_low);
Serial.print(” Hi:”); Serial.print(a.range_high);
Serial.print(” L:”); Serial.print(a.level);
Serial.print(” Cur:”); Serial.println(val);
lcd.print(lcd_level_meter);
}
void lcd_println(char *s) {
lcd.print(s);
lcd.setCursor(0, 1);
}
void lcd_println(int v) {
lcd.print(v);
lcd.setCursor(0, 1);
}
//************************************************************
// IR functions
I’m clueless , plus beginner , I’ll wait for your response before the project build .
Thank you for your patience and Answer
Y.
It sounds like you didn’t add the Bounce library to your Arduino installation. I’m pretty sure I used this one: https://github.com/thomasfredericks/Bounce-Arduino-Wiring but it looks like he’s upgraded it, so you probably need to download and install Bounce1.
Olá , gostei muito deste projeto, parabéns, estou tentando reproduzir este projeto, estou com muita dificuldade em utilizar as bibliotecas deste projeto.